


MACHINE ASSISTANCE
GRAN LATTISSIMA

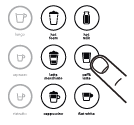
Coffee Preparation

Milk-based beverages preparation

Descaling

Daily Care

Cup size programming

Water hardness setting

Directions for first use or first use after a long period of non-use

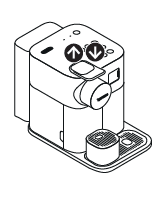
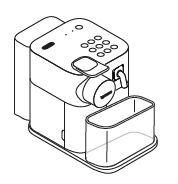
Machine presentation

Assembling / Disassembling of Rapid Capuccino System

Restoring quantity to factory settings

Hand washing of Rapid Cappuccino System

Emptying the system before a period of non-use, for frost protection or before a repair

Changing Automatic Power Off
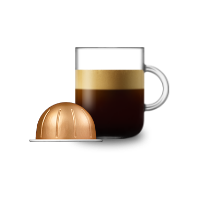
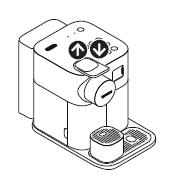
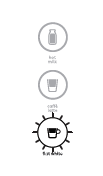
- Lift the lever completely and insert the capsule.
- Close the lever and place a cup under the coffee outlet
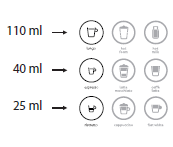
- Press the ristretto, espresso or lungo button. Preparation will stop automatically.
- To stop the coffee flow or top up your coffee, press again. Lift and close the lever to eject the capsule into the used capsule container.

Step 1 of 4
 Coffee Preparation
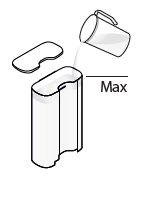
- Fill the milk container. Do not overfil the milk container: respect the MAX level. Close the milk container
- Lift the lever completely and insert the capsule. Close the lever. Close the milk container and connect the Rapid Cappuccino System to the machine. Machine heats up for approximately 15 seconds (blinking lights).
- Place a Cappuccino cup or a Latte Macchiato glass under the coffee outlet and adjust milk spout position by rotating it up to the centre of the cup. Turn the milk froth regulator knob to the Froth position.
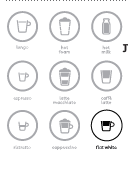
- Press the button relative to the desired milk-based beverage.
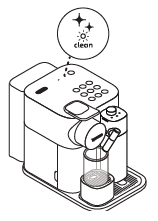
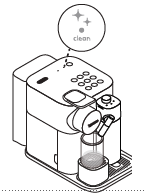
- At the end of the preparation, the Clean alert illuminates orange to indicate it is necessary to clean the Rapid Cappucino System.
- Place a container under the coffee outlet. Turn the milk froth regulator knob to Clean position. Milk system rinsing process starts and hot water combined with steam flows through the milk spout. The rinsing process stops automatically.
- Lift and close the lever to eject the capsule into the used capsule container.
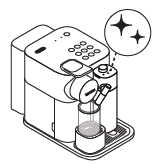
- When the rinsing process is finished, the clean alert is resumed. Put back the knob to froth position.
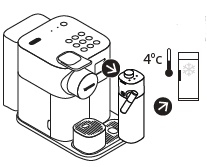
- If there is milk in the Rapid Cappuccino System: Disconnect the Rapid Cappuccino System from machine and place it immediately in the refrigerator. Close the machine steam connector door.
- If there is no more milk in th R.C.S or not enough for the following recipes or 2 days have passed. before refilling it, disassemble the R.C.S and clean all the components in the upper side of your dishwasher. In case a dishwasher is not available, refer to section "Hand washing of Rapid Cappuccino System".
Step 1 of 10
 Milk-based beverages preparation
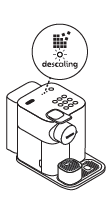
- Descale The Machine when descaling alert shines orange in ready mode.
- Lift and close the lever to eject any capsules in the used capsule container.
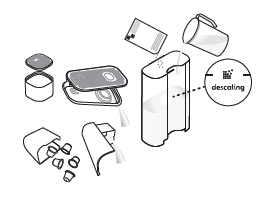
- Empty the drip tray, used capsule container, cup support, and drop collector. Fill the water tank with 100 ml of Nespresso descaling agent. Add water up to the Descaling mark on the water tank (500 ml).
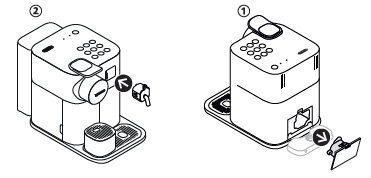
- Take the descaling pipe situated at the back of the machine and plug the descaling pipe into stream connector of machine. Replace water tank.
- The machine enters the descaling mode. The descaling alert blinks orange during the entire descaling process. The flat white button illuminates white.
- Place a container with a minimum 1 litre capacity under both the coffee outlet and under the descaling pipe nozzle.
- Press the flat white button. Descaling product flows alternately through the coffee outlet, descaling pipe and drip tray. When the descaling cycle is finished (water tank runs empty), the flat white button shines.
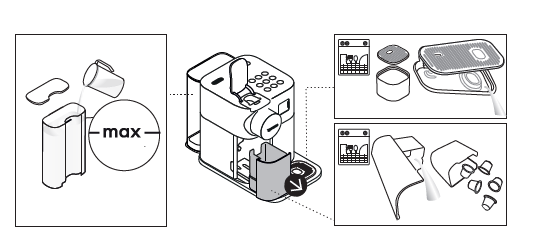
- Empty the drip tray, used capsule container, cup support, and drop collector, rinse out and fill the water tank with fresh potable water up to level MAX.
- Press the flat white button again. The rising cycle continues through the coffee outlet, descaling pipe and drip tray until the water tank turns empty.
- Once the rising process is finished, the machine switches off. Remove descaling pipe with handles or knobs, and store it. Empty drip tray and used capsules container. Fill water tank with fresh potable water. Warning! Descaling pipe becomes hot during operation. Use handles or knobs to avoid possible burns.
- Clean the machine using a damp cloth, you have now finished descaling the machine. NOTE: If the descaling cycle is not completed correctly (e.g. no electricity, pipe disconnection, insufficient water in the tank) the machine requests to repeat the cycle from the beginning.
Step 1 of 11
 Descaling
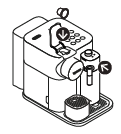
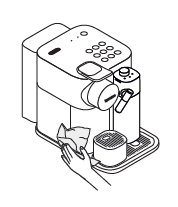
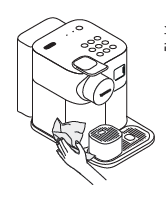
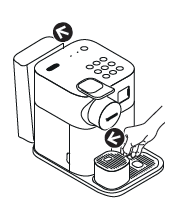
- Lift and close the lever to eject the capsule into the used capsule container. Remove drip tray, used capsule container, cup support and drop collector. Empty and rinse. Remove water tank, Empty, rinse it before filling with fresh potable water.
- Place a container under coffee outlet and press the lungo button to rinse.
- Clean the coffee outlet and machine surface with a clean damp cloth.
Step 1 of 3
 Daily Care
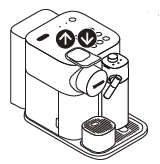
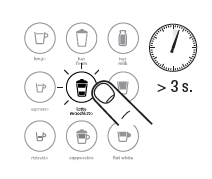
- Touch and hold the button relative to the drink you want to programme for at least 3 seconds to enter the programming mode. Brewing starts and button blinks fast.
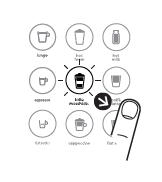
- Release button when desired volume is reached. If the recipe includes other ingredients, press again the button and keep pressed until the desidered volume is reached, then release. When the last ingredient is delivered, button blinks 3 times to confirm the new drink volume. Drink volume is now stored for the next preparations.
Step 1 of 2
 Cup size programming
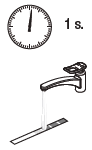
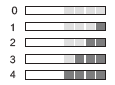
- Take water hardness sticker placed on the first page of the user manual attached your machine and place it under water for 1 second.
- The number of red squares indicates the water hardness level.
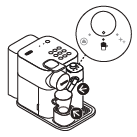
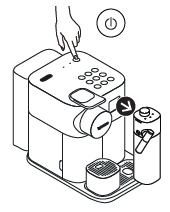
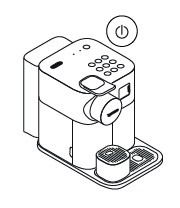
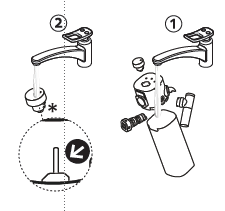
- Switch the machine ON. NOTE: remove milk jug.
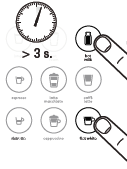
- Press simultaneously hot milk and flat white buttons for 3 seconds to enter Menu mode: descaling and clean alert start blinking. NOTE: The Menu mode exits automatically after 30 seconds if no actions are performed. It can be exit manually by pressing simultaneously hot milk and flat white buttons for 3 seconds.
- Press cappuccino button.
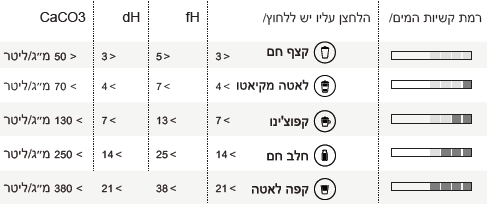
- The number of red squares indicates which button you should press (see table in the user manual attached your machine). No, within 30 seconds, you can set the desired value by pressing the corresponding button. They blink 3 times rapidly to confirm new value. The menu exits automatically and machine returns to ready mode.

Step 1 of 6
 Water hardness setting
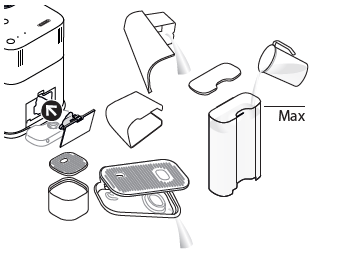
- When unpacking the machine, remove the plastic film, wter tank, drip tray, and capsule container. Adjust the cable length and store the excess in the cable guide under the machine.
- Rinse the water tank before filling with fresh potable water up to maximum level. Plug machine into mains.
- Switch the machine on by pressing the on-standby button- Blinking lights (coffee buttons): heating-up (25 S) - Steady lights: ready
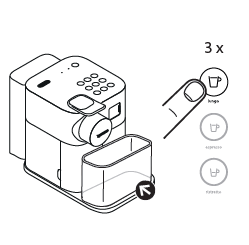
- Rinsing: place a container (not provided with the machine) under coffee outlet and press the lungo button. Repeat three times. NOTE: Machines are fully tested after being produced. Some traces of coffee powder could be found in rinsing water.
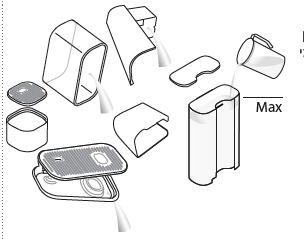
- Disassemble the Rapid Cappuccino System and clean all 6 components in the upper level of your dishwasher. In case a dishwasher is not available, refer to the "Hand Washing of Rapid Cappuccino System" Instruction. After reassemble and re-attach the R.C.S to the machine, use the Clean function before preparing milk beverage.
Step 1 of 5
 Directions for first use or first use after a long period of non-use
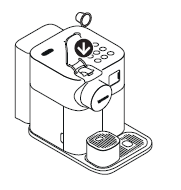
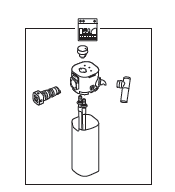
 Machine presentation
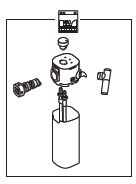
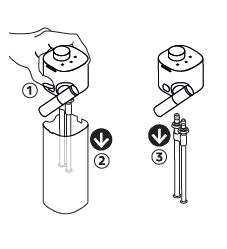
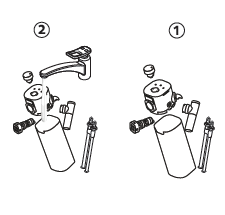
- Remove the milk container by pressing the buttons on the sides of the milk jug. Unplug the aspiration tube. Caution: When assembling the R.C.S insert well the aspiration tube until it cannot move.
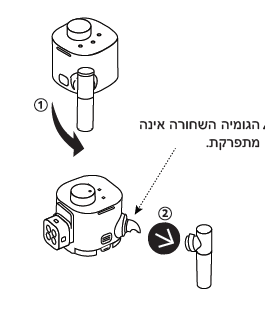
- Position the milk spout vertically to disassemble and to reassemble.
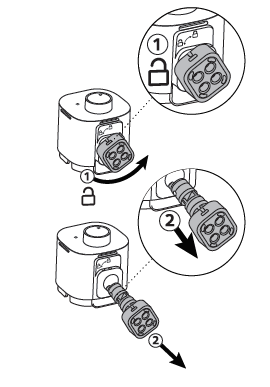
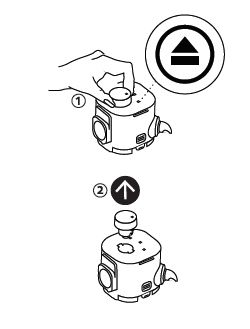
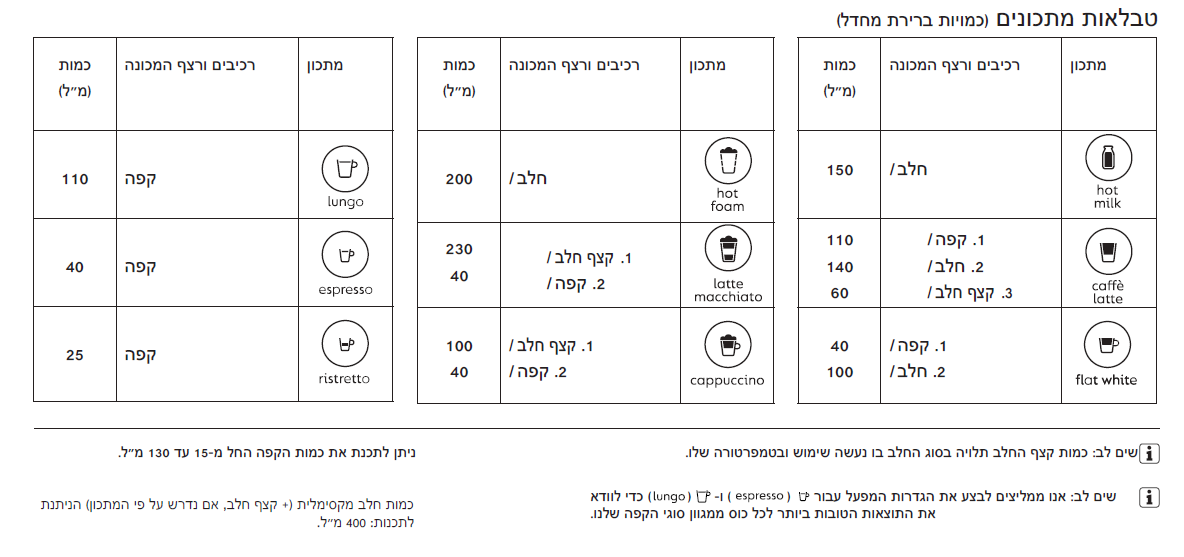
- Turn the Rapid Cappuccino System connector until the "unlock" symbol and extract it.
- Turn the milk froth regulator knob on the "remove knob" position and extract it.
Step 1 of 4
 Assembling / Disassembling of Rapid Capuccino System
- Switch the machine ON. NOTE: remove milk jug.
- Press simultaneously hot milk and flat white buttons for 3 seconds to enter Menu mode: descaling and clean alert start blinking. NOTE: the Menu mode exits automatically after 30 seconds if no actions are performed or can be exited manually by pressing simultaneously hot milk and flat white buttons for 3 seconds.
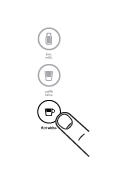
- Press flat white button: it blinks.
- Press flat white button: it blinks 3 times rapidly to confirm restoring the quantity to factory setting.
Step 1 of 4
 Restoring quantity to factory settings
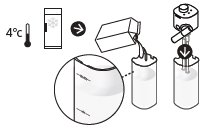
- Note: Dishwashing is recommended: when a dishwasher is not available, the Rapid Cappuccino System components can be washed by hand. The procedure must be performed after each use. Disassemble the Rapid Cappuccino System. Refer to Instruction "Assembling / Disassembling of Rapid Cappuccino System". Rinse away carefully any milk residue with hot potable water (40C / 104F). Remove all the visible dirt with a sponge.
- Soak all components in with hot potable water (40C / 104F) together with mild/soft detergent for at least 30 minutes and rinse thotoughly with hot potable water (40C / 104F). Do not use odor mild / soft detergents.
- Clean the interior of the milk tank, the milk spout connector, and the milk knob with mild / soft detergent and rinse with hot potable water (40C / 104F). *Ensure air inlet is clean. This will ensure perfect foam. Do not use abrasive material that might damage the surface of the equipment.
- Dry all parts with a fresh and clean towel, cloth or paper and reassemble. if the Rapid Cappuccino System was very dirty, proceed with two rinsing of the system by turning the milk froth regulator knob to Clean position. Milk system rinsing process starts and hot water combined with steam flows through the milk spout. Note: If you see that after the cleaning process the Rapid Cappuccino System is still dirty, we recommende to purchase a new one addressing to a Service Centre.
Step 1 of 4
 Hand washing of Rapid Cappuccino System
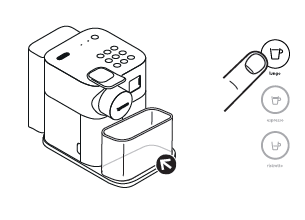
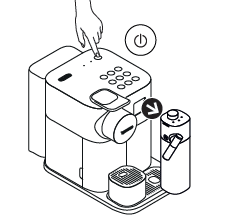
- Switch the machine ON. Note: remove milk jug.
- Remove the water tank. Lift and close the lever to eject any remaining capsule. Place a container under the coffee outlet.
- Press simultaneously hot milk and flat white buttons for 3 seconds to enter Menu mode: descaling and clean alert start blinking. NOTE: the Menu mode exits automatically after 30 seconds if no actions are performed. It can be exit manually by pressing simultaneously hot milk and flat white buttons for 3 seconds.
- Press espresso.
- Press the espresso button for confirmation. Once pressed, the emptying starts. All buttons blink alternately: emptying mode in progess. When the process is finished, the machine switches off automatically. NOTE: appliance will be blocked for approximately 10 minutes after emptying. CAUTION: Storing the machine in a cold environment. might cause damages by frost to the water circuit and create leakages.

Step 1 of 5
 Emptying the system before a period of non-use, for frost protection or before a repair
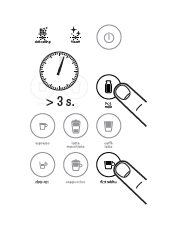
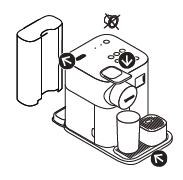
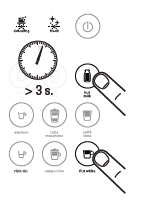
- NOTE: This Machine is equipped with an excellent energy consumption profiles as well an automatic power off function (OW) which enables you to save energy. Based on factory settings. the appliance switches off after 9 minutes after last use. Switch the machine ON.
- Press simultaneously hot milk and flat white buttons for 3 seconds to enter Menu mode: descaling and clean alert start blinking. NOTE: the Menu mode exits automatically after 30 seconds if no actions are performed. it can be exit manually by pressing simultaneously hot milk and flat white buttons for 3 seconds.
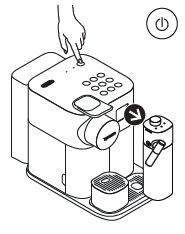
- Press ristretto
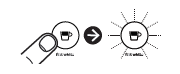
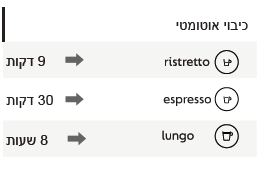
- Now, within 30 seconds, you can change the automatic power off and set the desired value by pressing the corresponding button. See table for more details. They blink 3 times rapidly to confirm new value. The menu exits automatically and machine returns to ready mode.


Step 1 of 4
 Changing Automatic Power Off


